

Table of Contents
- What Is Ink Starvation in Printing?
- How Ink Starvation Develops in Your Equipment
- Troubleshooting Print Head Starvation: Identifying the Problem
- DTF Printer Banding Issues and Ink Starvation
- Industrial Printer Maintenance Schedule to Prevent Starvation
- When to Seek Professional Repair
- Frequently Asked Questions
Last Updated: September 24, 2026
What Is Ink Starvation in Printing?
Ink starvation printing occurs when insufficient ink reaches the printhead, resulting in missing nozzles, faded output, or complete loss of colour in specific areas. The printhead expects a constant, pressurised flow of ink to fire droplets precisely onto the substrate. When that supply fails, whether through air pockets, blockages, or component wear, the nozzles either fire weakly or not at all.
This isn't a cosmetic problem. When ink starvation develops, your print quality degrades immediately, and the longer you run the machine, the worse the damage becomes. Nozzles can permanently clog if they fire without adequate ink supply. What starts as a minor quality issue can escalate into equipment downtime that costs far more than addressing the root cause early.
The condition affects all modern print systems: DTF printers using CMYK or speciality inks, UV engines relying on fast-cure formulations, and laser-based systems where ink consistency directly impacts output. Understanding what causes ink starvation and how to identify it early is essential for any operation that depends on consistent, high-quality prints.
How Ink Starvation Develops in Your Equipment
Ink starvation develops through three primary failure paths: air entering the system, physical blockages in the delivery path, and deterioration of the dampers that regulate flow. Each mechanism starves the printhead differently, but all produce the same result: inadequate ink supply.
Air Entering the Ink System
Air in the ink lines is the most common cause of starvation. Ink is a liquid; air is compressible. When air enters the system, through loose fittings, cracked tubing, or a reservoir running too low, it creates an air lock. The printhead cannot draw ink past the air bubble, even if ink sits just beyond it in the line.
Air typically enters through three points: the reservoir connection, where vibration gradually loosens fittings over months; the fill port, if caps are removed carelessly during maintenance; or through micro-cracks in aged tubing that develop under the pressure cycling of normal operation. Once air is present, the printhead's vacuum cannot overcome it. You'll see colour loss that corresponds to which ink line has trapped air, usually affecting one or two colours while others print normally.
Prevention is straightforward: maintain proper reservoir levels, inspect all connection points monthly for tightness, and replace any tubing showing discolouration or brittleness. If air does enter, bleeding the system, forcing ink through the lines to purge air, is usually effective, but it requires knowing the correct procedure for your specific machine.
Blockages in the Ink Delivery Path
Particulate matter, dried ink, or crystallised additives can accumulate in the narrow channels between the reservoir and the printhead. These blockages don't need to be large; a speck of dust or a small ink crystal in a 0.3mm line is enough to restrict flow significantly.
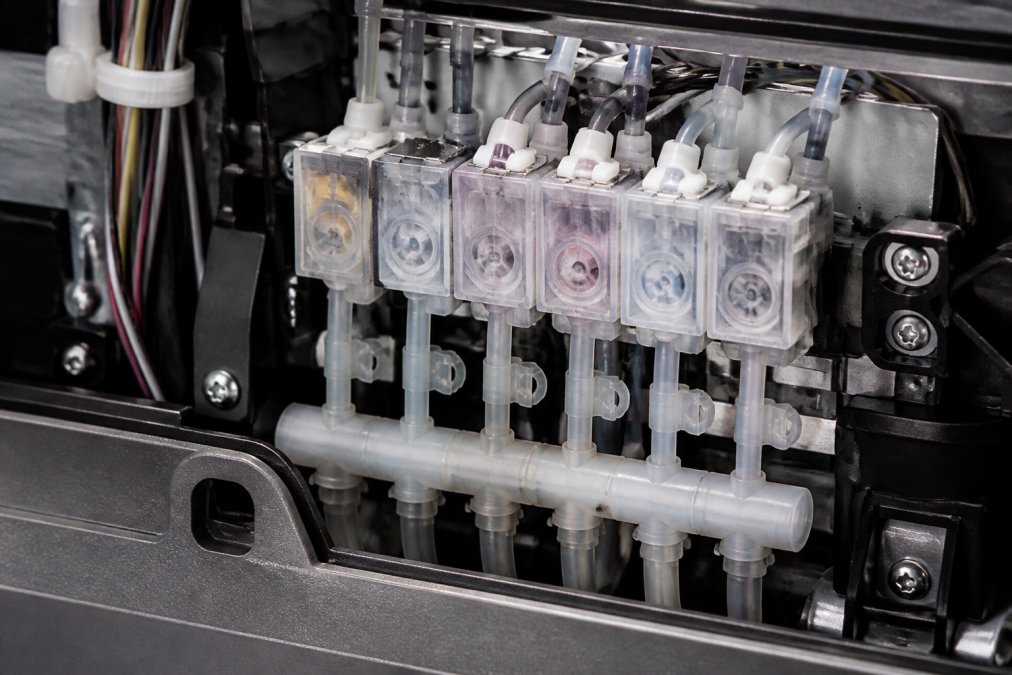
Blockages form most commonly in the damper, the small chamber designed to buffer pressure fluctuations and filter the ink before it reaches the nozzles. Over time, the filter element becomes saturated with particles, reducing flow. In DTF systems using pigment-based inks, this happens faster because pigment particles are larger than dyes. UV inks, which cure rapidly and contain additives that promote adhesion, are also prone to building up residue.
A blocked damper produces a specific symptom: the colour affected prints, but weakly, and the weakness is consistent across the print. Unlike air locks, which may cause intermittent firing, a blockage creates steady under-supply. The printhead fires, but not enough ink reaches the nozzles to produce full saturation.
Worn or Damaged Dampers
The damper is a wear item. It filters incoming ink, absorbs pressure spikes, and maintains back-pressure on the printhead. Over thousands of print cycles, the internal filter element degrades, and the seals that hold pressure can crack or lose elasticity.
A failing damper allows two problems simultaneously: reduced ink flow (because the filter is clogged) and air ingress (because seals no longer hold a tight fit). This combination accelerates the onset of starvation. You'll notice colour fading that worsens over days, not hours, because the damper is gradually failing rather than suddenly failing.
Dampers are designed to be replaced during routine maintenance. Depending on your machine and ink type, replacement intervals typically range from three to six months of regular operation. Delaying damper replacement is a false economy, a worn damper costs you in lost print quality, wasted substrate, and accelerated wear on the printhead itself.
Troubleshooting Print Head Starvation: Identifying the Problem
Start with the simplest checks before assuming internal failure. Many ink starvation printing symptoms resolve through basic maintenance.
Check reservoir levels first. A low reservoir cannot maintain adequate pressure. Fill to the marked line and run a cleaning cycle. If colour returns, the problem was simply air entering at the reservoir connection. Tighten the cap and monitor levels daily.
Inspect all visible tubing and fittings. Disconnect the ink line at the printhead end (with the machine off and unpressurised) and look for cracks, discolouration, or brittleness in the tubing. A cracked line will show ink residue around the crack. Replace any tubing showing damage. Check every fitting for tightness by hand, they should require firm pressure to tighten further.
Run a cleaning cycle and observe the output. Most printers have a cleaning routine that forces ink through the system under pressure. After cleaning, print a colour test pattern.
DTF Printer Banding Issues and Ink Starvation
DTF printer banding issues often stem directly from ink starvation, though the symptom appears differently than in other print systems. Banding, visible horizontal lines or colour shifts across the print, occurs when the printhead fires inconsistently as it moves across the substrate.
Industrial Printer Maintenance Schedule to Prevent Starvation
Preventative maintenance is far cheaper than emergency repair. A structured schedule prevents starvation before it damages your equipment.
Weekly checks (5 minutes):
- Inspect reservoir levels and top up if below the marked line
- Visually inspect visible tubing for cracks or leaks
- Run a colour test print and compare to a baseline, note any colour shifts or missing nozzles
Monthly checks (15 minutes):
- Tighten all ink line fittings by hand, they should require moderate pressure
- Check the damper for visible cracks or leaks
- Run a full cleaning cycle and print a detailed colour test
- If any colour is weak, run a second cleaning cycle immediately
Quarterly maintenance (30-60 minutes, depending on machine):
- Replace the ink damper as a routine part of maintenance
- Flush the ink lines with a cleaning solution appropriate to your ink type
- Inspect the printhead under magnification if your machine allows access
- Document the maintenance in a log, this helps identify patterns
Annual service (2-4 hours, may require specialist support):

- Full system pressure test to confirm all lines hold proper pressure
- Replacement of any tubing showing age or discolouration
- Professional cleaning of internal ink pathways
- Calibration of pressure sensors if your machine has them
When to Seek Professional Repair
Some starvation problems are beyond field troubleshooting. Knowing when to call a specialist prevents further damage.
Call for professional support if:
- Colour loss persists after damper replacement and cleaning cycles
- You observe ink leaking from internal pathways or the printhead itself
- The printhead fires weakly even after reservoir refilling and cleaning
- You suspect the printhead has permanent nozzle damage (missing nozzles in the same position across multiple test prints)
- Pressure sensors show abnormally low readings, or you lack equipment to measure pressure
Frequently Asked Questions
What are the main symptoms of ink starvation in a printhead?
Ink starvation produces distinctive visual defects. You'll notice missing nozzles, where entire columns of the printhead stop depositing ink, creating white streaks or gaps in your output. Colour banding appears as horizontal lines where ink delivery is inconsistent. Print quality deteriorates noticeably, fine details blur, colours become uneven, and coverage becomes patchy. These symptoms typically worsen as the machine runs because air pockets expand within the system. Unlike temporary clogs that resolve after a cleaning cycle, ink starvation persists across multiple jobs.
How does ink starvation differ from printhead clogging?
Clogging occurs when dried ink or contaminants physically block nozzles, but ink still reaches the printhead. Cleaning cycles often resolve clogging. Ink starvation means insufficient ink reaches the printhead in the first place, the supply itself is compromised. A blocked damper, air in the lines, or a failing pump causes starvation. Clogging affects random nozzles; starvation typically affects entire nozzle rows or channels systematically. If cleaning doesn't restore print quality, you're likely dealing with starvation rather than a simple clog.
Can poor maintenance lead to permanent ink starvation damage?
Yes. Neglecting routine maintenance allows contaminants to accumulate in dampers and ink lines, causing progressive blockages. Air pockets form and expand without regular purging. Over time, these issues can damage the printhead itself, nozzles may become permanently inactive if they've been starved of ink for extended periods. However, most starvation issues are reversible if caught early. Replacing worn dampers, flushing the system, and restoring proper ink flow can restore full functionality. The longer starvation persists untreated, the greater the risk of permanent printhead degradation.
How can I prevent ink starvation through routine maintenance?
Follow a structured industrial printer maintenance schedule: check ink levels daily and maintain them above the minimum line, inspect dampers monthly for blockages or discolouration, run purge cycles weekly to expel air from the system, and replace dampers every 6-12 months depending on usage volume. Keep your facility clean to minimise dust entering the ink system. Monitor print quality closely, catching early signs of starvation prevents costly downtime. For DTF and UV systems, use only compatible inks to prevent viscosity issues that restrict flow. Professional servicing twice yearly identifies wear before it becomes critical.