

Table of Contents
- What You'll Need Before You Start a DTF Printhead Replacement
- Signs of a Failing DTF Printhead
- Best Tools for DTF Printer Repair
- Step 1: Power Down and Prepare the Print Engine
- Step 2: Remove the Old Printhead and Fit the Replacement
- DTF Printer Head Alignment Guide
- Common Mistakes in DTF Printhead Replacement
- Frequently Asked Questions
Last Updated: September 17, 2026
What You'll Need Before You Start a DTF Printhead Replacement
Replacing a DTF printhead is a controlled procedure, not a repair you improvise. The printhead is the most critical and most sensitive component in the machine, and one wrong move with a cable or a voltage setting can destroy a new head before it ever fires a drop. This guide from Laserprints walks through how to replace DTF printer printheads step by step, from power-down to final nozzle check, using the same sequence our engineers follow on customer sites.
Before you touch anything, confirm you have the correct replacement. Printheads are not interchangeable across platforms. An I3200-A1 head, an XP600 F1080-A1 head and an L1800 head each suit different machines and ink configurations, and fitting the wrong one wastes both the part and your production window.

Gather the following:
- Replacement printhead matched to your printer model
- Lint-free gloves and a clean, dust-free work mat
- Printhead cleaning solution and swabs
- Isopropyl alcohol for cable contacts
- Precision screwdriver set
- Torque-limited driver or a steady hand
- Syringe or priming tool for ink lines
- Service manual or manufacturer's procedure for your exact model
Signs of a Failing DTF Printhead
A failing DTF printhead announces itself long before it dies completely. The early warnings are easy to mistake for ink supply problems, which is why so many operators replace the wrong part.
Watch for these signs:
- Persistent missing nozzles that do not recover after cleaning cycles
- Banding or visible lines across solid colour areas
- Ink drop-out in the middle of a print run
- Colour loss or a channel that fades gradually
- Complete loss of an individual ink channel
- Nozzle check patterns that degrade within hours of a successful clean
If a head has been through several deep cleans and the nozzle check still shows gaps, the head itself is the likely cause. Electrical damage, worn nozzles and blocked channels all produce the same symptoms, and none of them respond to further cleaning.
Best Tools for DTF Printer Repair
The right tools make the difference between a clean swap and a scrapped head. You do not need a full workshop, but you do need precision and cleanliness.
| Tool | Purpose | Why It Matters |
|---|---|---|
| Lint-free gloves | Handling the printhead | Skin oils contaminate nozzle plates |
| Anti-static wrist strap | Static protection | Static discharge kills head electronics |
| Precision screwdriver set | Carriage and bracket screws | Prevents stripped heads on soft screws |
| Printhead cleaning solution | Flushing and swabbing | Removes dried ink without abrasion |
| Syringe and priming tool | Drawing ink through lines | Restores flow after refitting |
| Service manual | Model-specific torque and settings | Wrong settings cause permanent damage |
A common mistake is skipping the anti-static strap. Printhead boards are far more static-sensitive than most operators assume. One discharge from a synthetic work shirt can take out a channel before the head is even seated.
For replacement parts, source from a supplier who confirms compatibility against your printer model, existing printhead model and machine identification plate. That confirmation step prevents the most expensive error in the whole process.
Step 1: Power Down and Prepare the Print Engine
Power down properly, then wait. Pulling the mains cable while the carriage is mid-cycle can leave the head parked in a position that makes removal awkward and risks damage to the capping station.
Follow this sequence:
- Run a normal shutdown from the printer's control panel.
- Wait for the carriage to park and the machine to complete its cycle.
- Switch off at the machine, then isolate at the mains.
- Leave the machine for the manufacturer's stated discharge period.
- Open the covers and inspect the carriage area for ink pooling or debris.
- Clean around the carriage before you remove anything.
That last step matters more than it looks. Loose dust or dried ink around the carriage will fall straight into the new head's nozzle plate during fitting.
Step 2: Remove the Old Printhead and Fit the Replacement
Removal and refitting is the point of no return. Work slowly, keep the head level, and never let the nozzle plate touch anything.
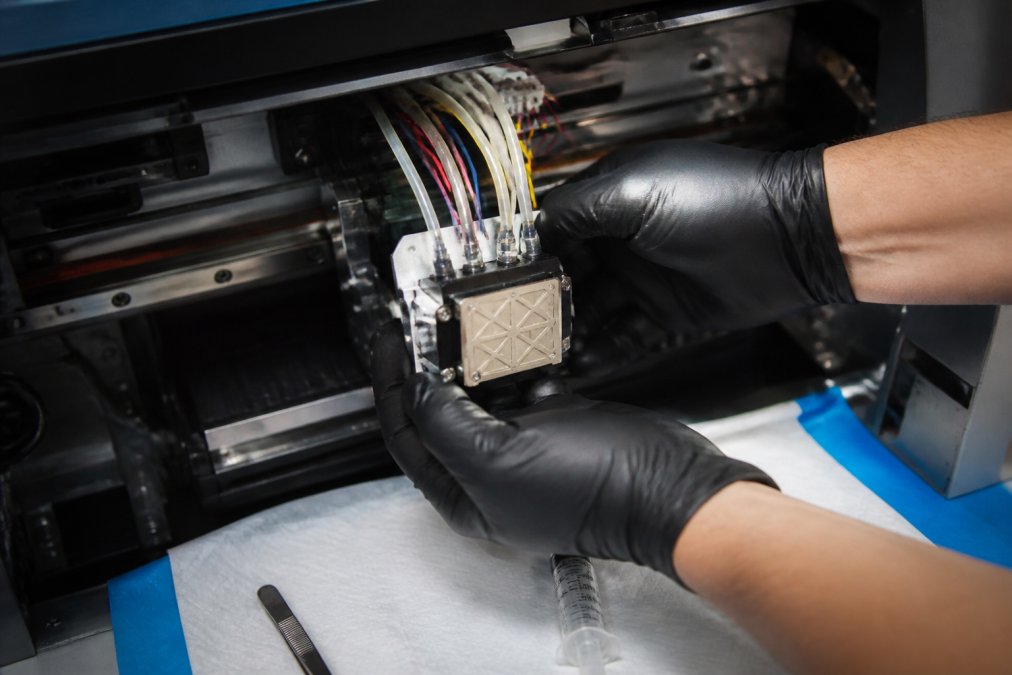
The sequence:
- Release the printhead cable from its connector, taking care not to bend the contact strip.
- Disconnect the ink lines and cap them to prevent spillage.
- Remove the bracket screws and lift the old head straight up and out.
- Place the old head on the work mat, nozzle plate facing up.
- Inspect the carriage for ink residue and clean it thoroughly.
- Unpack the new head and remove protective film without touching the nozzle plate.
- Seat the new head squarely in the carriage and fit the bracket screws.
- Reconnect the ink lines and the printhead cable.
- Prime the lines and draw ink through until it reaches the head.
- Run a nozzle check before returning to production.
Do not overtighten the bracket. The head sits on a datum surface, and excessive torque distorts the seating, which shows up later as banding you cannot clean away.
DTF Printer Head Alignment Guide
Alignment is what turns a successful installation into production-quality output. A head can be electrically perfect and still print badly if it is not aligned to the platen and to the other heads in the carriage.
Work through these checks in order:
- Vertical alignment: run the printer's built-in vertical alignment pattern and adjust in the smallest increments available.
- Horizontal alignment: correct bi-directional offset so both pass directions land on the same line.
- Head height: set the gap to the platen to the manufacturer's specification for your film thickness.
- Ink channel mapping: confirm each channel fires the correct colour in the correct position.
- Final nozzle check: verify a clean pattern across every channel before a production run.
Recheck alignment after the first hour of printing.
Common Mistakes in DTF Printhead Replacement
- Fitting the wrong head. I3200, XP600 and L1800 platforms differ in nozzle count, channel layout and print width. Confirm yours before ordering.
- Skipping static protection. A single discharge can kill a new head's board.
- Touching the nozzle plate. Even a light brush with a fingertip can block nozzles permanently.
- Reusing damaged cables. A worn or incorrectly connected head cable can destroy the replacement head on first power-up.
- Ignoring firmware and voltage settings. Incompatible printer settings are a documented cause of permanent printhead damage.
- Skipping the prime. Firing a dry head causes immediate and irreversible nozzle damage.
- Overtightening the bracket. Distorted seating produces banding that no cleaning cycle will fix.
When a replacement goes wrong, it usually goes wrong in the first ten minutes. If your machine needs a head that you are not confident identifying, or if a previous attempt has already caused damage, the sensible move is to have the job done by a specialist rather than risk a second head. Laserprints supplies replacement printheads including the I3200 Printhead A1, XP600 Printhead, L1800 Printhead and I1600 Printhead A1, and can confirm the correct part from your printer model, existing printhead model and a photograph of the machine identification plate.


Frequently Asked Questions
How do I know if my DTF printhead needs replacing?
Persistent missing nozzles after two or three cleaning cycles, banding across solid colour blocks, drop-out on single channels, and colour loss that returns within a few prints all point to a failing head rather than a clog. If the same nozzles stay dead after a manual flush and a nozzle check, the head is usually beyond recovery. Electrical damage from a bad cable or incorrect voltage shows the same symptoms, so check the cable and head board before ordering a replacement.
Can I replace a DTF printhead myself or do I need a technician?
You can do a DTF printhead replacement in-house if you have the right head for your machine, a static-safe workspace and a service manual or guided procedure. The job itself takes 30 to 60 minutes. Where it goes wrong is compatibility: I3200, I1600, XP600 and L1800 heads are not interchangeable, and mainboards, head boards, cables and firmware vary between manufacturers. Confirm the exact part number against your machine plate before you order, or ask your supplier to identify it from a photograph.
What tools are required to change a DTF printer printhead?
You need a set of precision screwdrivers, lint-free gloves, a syringe for flushing the ink line, lint-free wipes, a nozzle check pattern, and an anti-static wrist strap or mat. Keep a spare head cable on hand, since a damaged cable can destroy a new head on first power-up. For alignment you need the printer's own alignment routine plus a test print on transfer film. A torch and a phone camera help you photograph the old head's connector layout before removal.
How do I calibrate a new DTF printhead after installation?
Run a nozzle check first, then a head cleaning cycle, then repeat the nozzle check. Once all channels fire cleanly, run the printer's built-in head alignment routine and print the alignment pattern on transfer film rather than paper, because film shows registration errors more clearly. Adjust the vertical and horizontal values in small increments, reprint, and check the pattern under good light. Finish with a short production run and inspect for banding before releasing the machine back to full volume.
A printhead replacement that goes wrong costs far more than the part. It costs production hours, wasted film and, in the worst cases, a second head. Laserprints exists to remove that risk for businesses running professional-grade laser, DTF and UV print engines, with expert repair and servicing, genuine spare parts and remote support when you need a second opinion before you commit. Get started with Laserprints and keep your print engines running at the quality your customers expect.